
Today we will see the first step to install on a Pc the new OS X Mavericks operating system. Many of you surely already know the name given to the installation of the Apple operating system on a computer that is not original from Apple, it's called Hackintosh and after the jump we will show all the necessary steps to carry out this installation.
The first and most important thing is to comment that need some hardware requirements computer (especially compatible motherboard and Intel processor) to be able to carry out this installation and that this method only works with OS X Mavericks. On the other hand, remember that there are several methods of doing a Hackintosh and this is just one more, that is, it is very important to read the two parts of the tutorial before starting and download everything you need before launching to install OS X. It is also my important don't skip any step of this tutorial to work properly.
Let's go by parts, we need:
- Mavericks installation file downloaded from AppStore
- 8 Gb USB
- A functional Mac installation
- The utilities to modify the installation (Charmaleon, Kext, mach kernel)
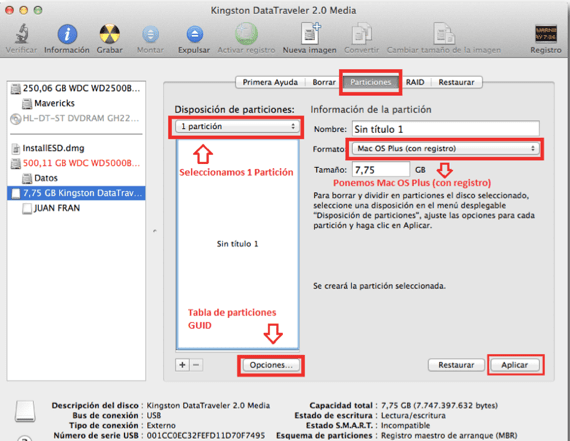
Now we need to have access to a fully functional Mac to format the 8GB USB
- On a functional Mac we go to disk utility (Utilities–> Disk Utility)
- We select the Usb in the left menu
- We access the partition tab
- In the Partition Layout option we select 1 partition
- Then we give the Options button and select the option GUID partition table and we accept
- How to Live Aligned with format we indicate Mac OS Plus (Journaled)
- Finally we apply the changes and wait for it to finish
Now after formatting the USB we go to the next step, ready for the installation
- The first thing we have to do is the option to activate the view of hidden files. From the terminal by entering the following command: defaults write com.apple.finder AppleShowAllFiles YES after inserting that command we write killall Finder
- We search and download the Mavericks installer, We right click on it by selecting the option Show package content
- Then we go to the route Contents -> SharedSupport -> double click on InstallESD.dmg
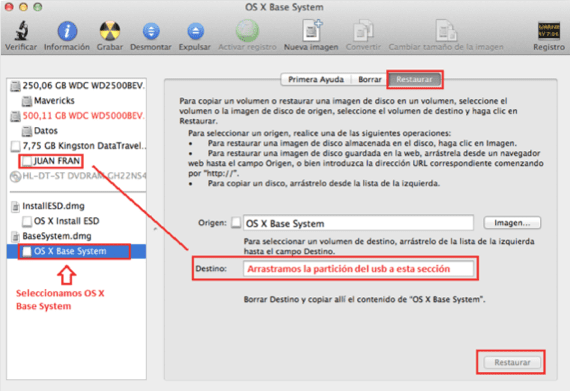
- We mount the file BaseSystem.dmg from the terminal by typing the following command open / Volumes / Mac \ OS \ X \ Install \ ESD / BaseSystem.dmg
- We return to the disk utility select the file we just opened via the terminal in the menu on the left
- Once we select we give the restore tab
- We drag the name of the partition of our Usb to Destination section and click on restore. We accept the deletion of the USB data and the process will begin
- Once finished In the finder we will see two icons with the same name Mac OS X Base System we must identify which is our usb, for it click on each icon and click on the Get information option and we look at the total capacity of that unit finding out which is the usb
- Once we find out which is the usb we go to the route / System / Installation and we delete the file called Packages
- We open the Mac OS X Install ESD file that we will have in the finder and we copy Folder Packages in the path / System / Installation of the usb
- We copy the file mach_kernel in the root of the usb (This file is in the download at the end of the tutorial)


The next and last step is to patch the installer, let's see how to do it
- We put on the route / System / Library / Extensions the two kext that we leave in the attached file at the end
- We run chameleon and we install it on our usb (In the attached file)
- At Lóleo Eventos, root of our usb we create a folder called Extras (Respect the capital letters)
- We open chameleon wizard and we go to the tab SMBios and click on Edit
- In the option SMBioses preset we select the configuration that best suits our team, once selected we give Save as and we keep it in the Extra folder that we have previously created in our usb
- We copy the folder downloaded at the end of this post in the root of the usb.

Now we have the USB ready To start with the installation, we leave the link for you to download what you need to get to this step right here. We continue in the next post with the installation of OS X Mavericks on our machine and some videos to see the tutorial.
Link - How to install OS X Mavericks on a PC (Hackintosh Part 2)
Hello, install mavericks 10.9 version niresh and everything barbarous, the problem is that I can't find a site that teaches me to load the "kext" I think this is what I need to load the missing drivers to make my pc work correctly. In principle I am interested in having internet, I already tried to install slytherin and multibeast but they are so complicated and in English that I do not understand anything. !!!!!! PLEASE!!!!!!! HELP !!!!!!!! How do I load these blessed Kext and where do I get what I need? There is no genius driver for me to automatically download what the notebook needs ????? From already thank you very much.
forget about Genius drivers and everything related to Microsoft PC, this is another system
Kext Utility is the application, you just drag the Kexts and the application does the rest, when this application is started it does a process of repairing permissions and then it installs the extensions, luckily
Hello, this article is almost 2 years old, I hope you can still answer me. According to the instructions you say, almost halfway through this first part you mention that you have to restore what you have opened and as a destination the usb and click on restore. But at the end of this first part there is an image that also does the previous steps. My question is, is it necessary to restore again at the end of the copy of the downloaded folder in the root of the usb? I appreciate your prompt response. Excellent article.
Good Carmen,
The picture does not need to illustrate the task but it is not necessary to restore again.
Regards!
Thanks Jordi for answering. I want to ask you another question or query. As for the Bios, do I have to leave it in Legacy Support or UEFI? Thanks in advance and happy ending.
Hello, I get that the download is no longer available
Downloading from Apple servers?
Hello I have done everything so far I only have the kernel mach and parhear left but it tells me that the download from mega is no longer available, you could upload the link again