How about Applelizados followers! I bring you the third installment of our tutorial «How to repower our MacBook Pro«. Today we will reuse the HDD that we replaced with the SSD, and we will use it as a second internal hard drive.
Since when have you not used a CD-DVD on Mac?
Digital storage has changed a lot in the past 50 years, and data storage media has undergone countless changes. Until a few years ago, the use of CD-DVD was the day to day, but by now they have fallen into disuse.
What we propose in this part of the tutorial is rreplace our SuperDrive and put a second hard drive in its placeEither a new SSD or a HDD.
To save us a little money, we will reuse the original HDD, which we already replaced previously, although you can use any other good, be it an HDD or an SSD. For this we need an adapter that we can get in several online stores, in our case it is We get for less than € 20 with free shipping by Amazon.
This adapter will allow us to integrate the DD in the place where our Superdrive was, using the same connections.
Let's do it
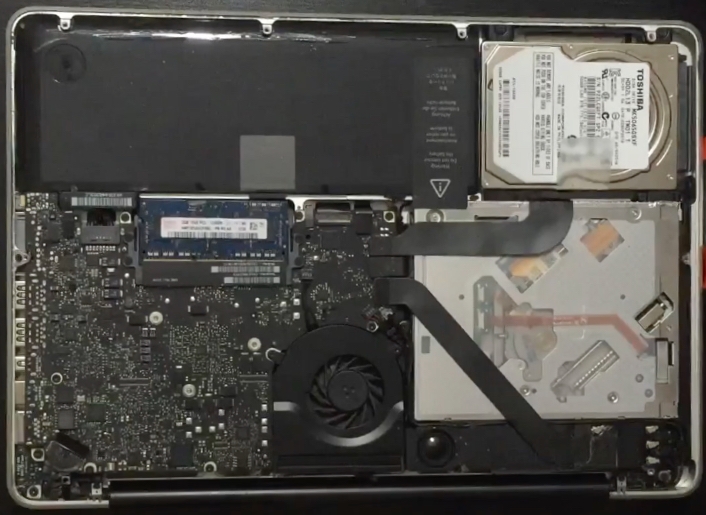
Step 1:. The first thing we will do is extract our SuperDrive. For this we must be careful with the multiple connections it has. We will carefully remove the 2 black flexes, to continue with the 6 screws that hold it.
If we need to remove any more cable because it is in the way, we can remove it, taking into account that we must remember where it is connected. After we remove the last screw, we can release the plastic base that is above, and we will easily remove the SuperDrive.
Step 2:. Now we have to place the HDD inside the adapter, for this we only have to loosen the screws that it has on the sides that serve as a spring when it is inside the Mac. We insert it inside, being very careful not to force it, then we adjust the 2 side screws the adapter to hold it. Finally, we remove the SuperDrive connector and connect it through the external part of the adapter.
Step 3:. The last step is to insert the adapter with the HDD into the Mac and connect it. We remove the plastic base to be able to place the adapter in position, being very careful not to bend the Flex. We place the screws and, if we disconnect any other cable to have better access to the screws, remember to connect it where it was going. Finally, when placing the Flex again, we will try to do it delicately, if we force we can bend any internal pin of the connectors.
And ready!! We already have our second storage unit installed. Finally, we only have to place the back cover of our MacBook Pro and we will have it repowered for another 2 years.
We can only invite you to our next tutorial where we will tell you how we can transform the internal SuperDrive drive of our MacBook Pro into an external drive.