
With the arrival of iOS 8 and later OS X Yosemite, the protocols of Handoff y Continuity in both systems, allowing certain actions that we started on a device could be continued on the Mac and vice versa. The things that can be done with this new concept of work have been somewhat limited and Apple has not yet fully developed it.
However, both our forgotten iOS personal assistant, Siri, and the new Touch ID have not been taken into account in the OS X Yosemite system, something that Apple will surely be considering since all its iOS devices currently have the famous fingerprint sensor. Now, that they have not implemented the power to use Siri on a Mac, does not mean that you can not.
As we told you, with the arrival of iOS 8 and OS X Yosemite, there were many changes and new additions among which are the Handoff, Continuity and the possibility of controlling the iPhone or iPad, as long as it is connected to the electrical network using the command "Hello Siri", because now our device is always listening to us.
In this article, we are going to tell you, in a small tutorial, how to control, although not entirely simple, your Mac using voice commands with the help of Siri. Before starting, we must emphasize that what we are going to propose is only going to work for you if on the one hand you have a Mac that is compatible with Continuity and on the other hand you have an iDevice with iOS 8 installed and the Siri assistant activated. If you meet these two premises, the steps you must follow are the following:
- The first thing you have to do is look at these Apple instructions on how to configure Continuity. In OS X you must go to System Preferences> General and activate the Handoff and on an iOS device we must enter Settings> General> Handoff and suggested apps. Once we have activated the Handoff on both teams we go to step two.
- We must have the synchronization of notes activated in our iCloud account. For this we must activate it on both computers equally. To see if we have it activated on the Mac, let's System Preferences> iCloud and in the window that appears we must make sure that the Notes item is selected. Now, on the iOS device we must enter Settings> iCloud and we verify the same.
- Now we are going to do a synchronization test and we are going to create, for example, a note using a voice command with Siri on the iPhone. We will say Create a note called "glitter". We have to bear in mind that the names that we put to these notes are the ones that in the future we will use to control our Mac, so stop for a second and think about a good name.
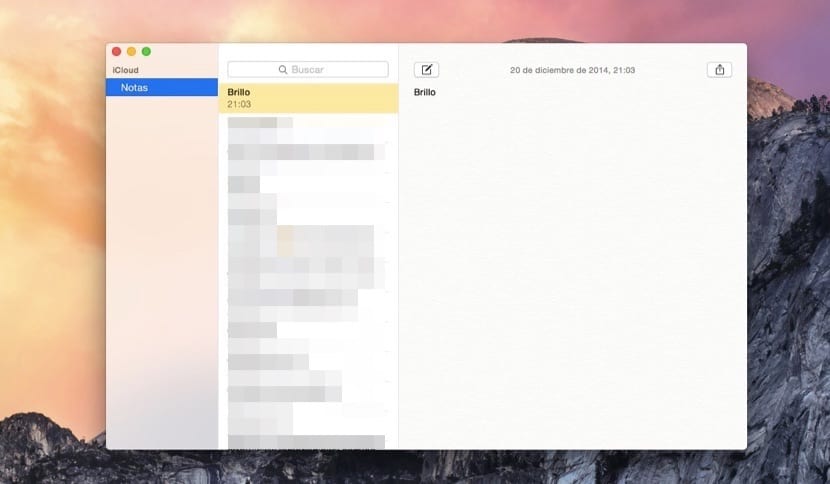
- We check that this note has been created on the iPhone and that it has been synced on the Mac.
- Now comes the second part of this tutorial, for which we must download this AppleScript, LLAMADA SiriListener2.scpt, with which we will be able to control our Mac through voice commands.
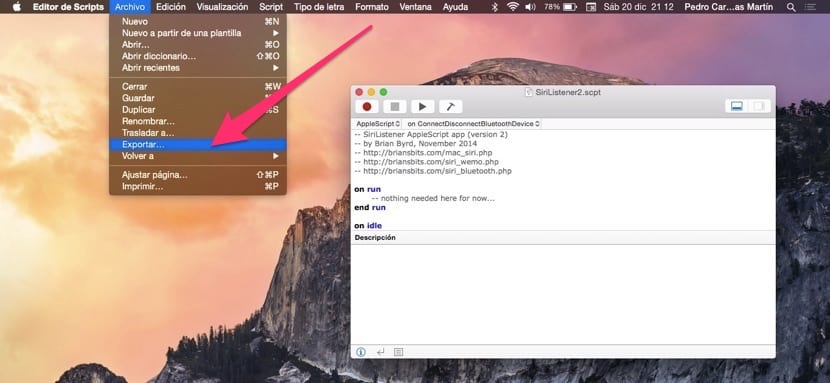
- We continue the process converting that AppleScript into an application for which, once we have it downloaded, we will have to edit it using the Script Editor that we can open through Spotlight by typing Editor Scripts. Now we look at Downloads the file SiriListener2.scpt and click on Open, after which the editor opens.

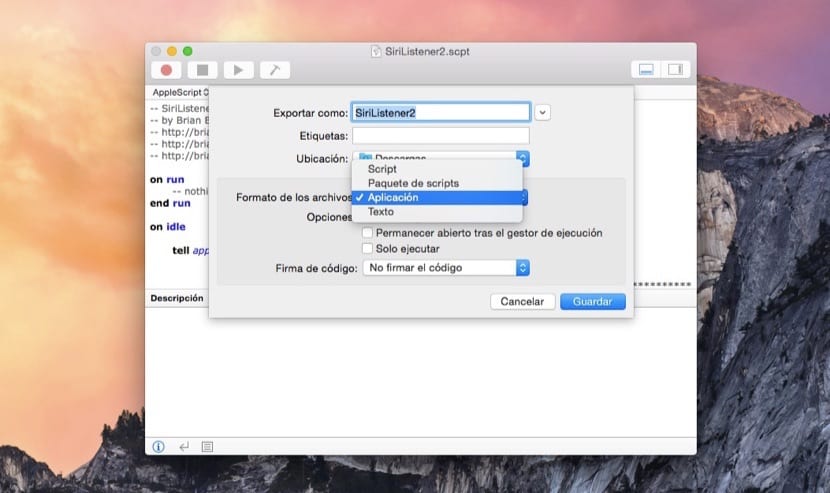
- Now we must go to the top menu and click on File> Export, selecting in the drop-down that says File format> Application and we mark the option Stay open after the execution manager. Keep in mind that the script that we have downloaded comes with the commands in English, so we can always edit it and change those commands for the equivalent in Spanish.
- Once we have modified, with great patience, the commands, it only remains to execute the AppleScript that is now an application. The executed and we leave it running in the background continuously, otherwise the invention will not work. We create notes with the commands we want and when they are synchronized they will be executed.
Well, with this tutorial you have been able to create a system that, using voice commands, does what you tell it with Siri, creating a new Note that will automatically be deleted each time. You can also do it manually and take the iPhone, enter Notes, write the command and you will see how seconds later the computer does it. In short, a somewhat curious programming exercise.