
On numerous occasions, the "Do not disturb" mode has been able to help you focus on your Mac, or even gain more privacy when sharing your computer screen with several people. You may spend your day activating and deactivating this mode from the notification center, but if you always need it in the same period of time, you don't need to do this continuously.
And it is that, if you wish, Apple has long given you the possibility of program this useful mode on your Mac, as it has been done for a long time on iOS devices, and if you want notifications not to appear for a predetermined hours every day, this may be the best solution for you.
How to set "Do Not Disturb" mode on Mac
As we mentioned, doing this is really simple, and of course you will not need to install any third party application, since it is something that Apple has allowed to do natively for several versions of macOS. And, obviously, if you wish, you can enable it outside of the time you set from the notification center, or later modify the hours you want it to be active.
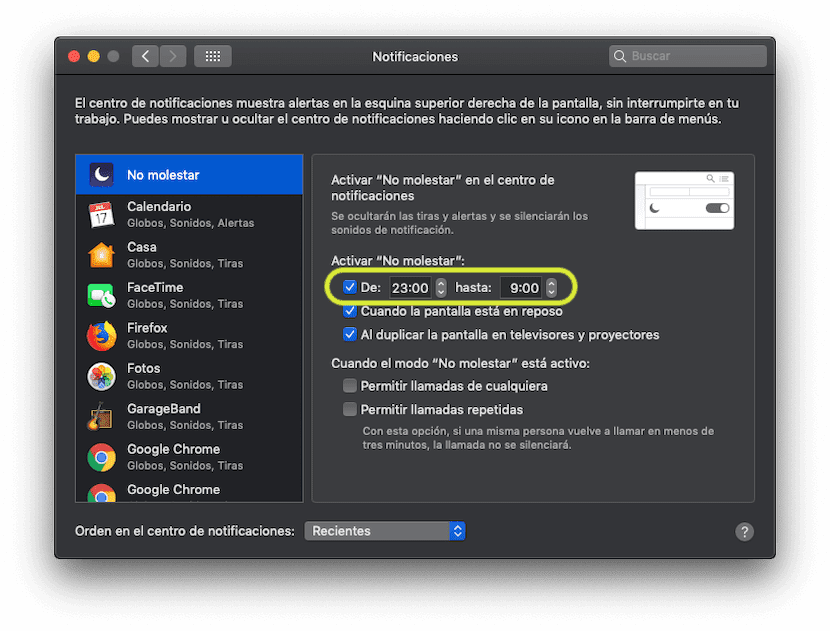
To activate the programming of the "Do not disturb" mode, you must first go to the system preferences application. Once inside, in the main menu, choose the section called "Notifications", and then on the left side, access the "Do not disturb" section.
You will see that the configuration options for this mode appear on the right side. You must pay attention to the call "Of:", since it is the one that allows you to program it. You should only check the box that appears just to the left, and then choose the start time as well as the end time you want, and voila, it will be activated automatically as soon as the time you have set arrives.
In addition, if you want, you can also allow that, for example, if they make a call through FaceTime, the notification will appear, if you wish, or that it does this only when they call you several times in a row. And, if you prefer, you can also make everything return to normal before the deactivation time arrives, for which you will only have to go to the notification center and deactivate it from the top.